The build was pretty stressful and involved all hands available to achieve. We started by measuring four feet between the image plane, and the Sony EX1 camera, on the lengths of wood I had purchased from Wickes the night before. Then we placed the planks of wood on a step-ladder and a rubbish bin as a temporary resting place. The aim was to replace the bin with two legs that where adjustable in height. To achieve the next stage of construction we needed to establish the final location of the camera which would be on a incline of 10 degrees – this would need to be factored into the positioning of the legs on the front of the system. We where now running short of time to achieve the shot before the train departed on its next hour long journey. Dan Duran found time to help and we soon had the system nearly complete. Our next challenge was to move it to the other end of the station where we would be filming. To do this we moved it in sections and then finalised construction on arrival. Once the system was in place and the camera was focused and fixed we sealed out any ambient light so as to achieve a bright enough image on the image plane. Once the camera was sealed in it became very difficult to make any adjustments to the framing etc.
Showing posts with label Pinhole Photography. Show all posts
Sunday, 21 November 2010
The Town of Figure Eight - Shoot Day 1
After an hour and a half journey we arrived at Chinnor Steam Railway for a 9am start. There was a few different shots we needed to achieve throughout the day. The first was a shot from the back of the train going through the country side using a HD hero - excellent for shooting in tough locations where there is a risk of potential damage to the camera. The only draw back of the HD hero is the fact it can only shoot at 30 frames a second - not ideal for TV broadcasting (firmware update now available for 25 fps shooting). However this was fine for us as we intend to use the footage for back projection. After the first train run we knew were we where with that shot and had it under control. This meant I could now move my attention over to constructing the Filmable Pinhole Camera System ready for the shot scheduled for around 12ish.
The day before the shoot
I had to work on the Saturday before the shoot and knew that when I finished I would need to go straight to B&Q to purchase some last minute items to enable the Filmable Pinhole Camera system to work. I checked the closing time and had two hours to achieve my goal. On my way from Lewisham on the bus too Greenwich. I suddenly remembered that there is a Wicks building suppliers a lot closer and walkable to Dan Duran's place - perfect to drop of the materials for transport to the Chinnor location at 7.30am the next morning. So I jumped off the bus and walked the five minutes journey. When I arrived at Wicks I asked for a pen and paper so I could sketch out a rough design of how the system may work.
| Rough design of frame |
| More rough designs |
I set about shopping for the materials I believed would be needed to construct a frame that would both give enough length for the four feet minimum distance for focus and enable a light proof space around the image plane and the Sony EX1. It was now very clear we would have our work cut out for us in the morning.
Final test and finishing touches
Now that we had a system that produced an image bright enough to be filmed, it was time to do just that. I took the box round to Dan Duran's house as he owns the Sony EX1 Camera we would be using for the actual shoot on the weekend. We set up the filmable pinhole camera in the front room at night and soon realised creating enough light to replicate the daylight situation we would be filming in would be hard. So instead I borrowed Dan's light box and placed an X using black gaffa tape on the middle of it so as to be able to clearly see a focus mark. I then set about moving the light box with the X on backwards and forwards to get a better understanding of the depth of field and focal length of the lens. Form this test it became very clear the distance between the EX1 and the image plane would need to be around about four feet. This I believe was due to the low light situation and the need to zoom the image slightly for framing. Whilst the box was at Dan's he kindly sprayed the inside black so as to reduce the amount of light bouncing around inside. We also found time somehow to smarten it up for the imminent shoot date on Sunday at Chinnor Steam Railway. To do this we coated the now tatty outside of the box with white card and decorated the hole around the lens with a flaming trim.
Sunday, 31 October 2010
Testing focus
Now that a lens had been incorporated into the filmable pinhole camera system I needed to know how much of the image would be in focus due to the fact that using a lens creates what is called Depth of Field. I also needed to test how to set the focal distance by moving the lens nearer and further away from the image plane. To determine this I decided to create a basic test outside my house using some homemade distance markers and a brick wall.
By measuring in five feet increments I could get a rough idea of how close or far the subject of our film should be for a good focus to be achieved. I started by setting up the first marker five feet from the box and then the others in further five feet steps as shown in the picture above. I then took a series of photographs of the resulting image created inside the box moving the lens each time.
The first photo above clearly shows the focus to be around the first marker placed at five feet from the box. The wall around the marker is a good way of seeing the depth of field - what is in focus. I marked the position of the lens from the image plane and moved it a few millimeters to see how the focus changes in the next picture bellow.
The second photo at the new lens position shows how the focal length was affected as the 10 and fifteen feet markers are now sharper focus than the five feet marker. Also the depth of field appears to be larger in this photo.
In this photo I have moved the lens once more increasing the focal distance. All markers are now soft focus and the road and houses in the background are sharp focus. Both the focal distance and the depth of field have increased significantly in this photo.
This test, although very rough, did help cement a few issues with the system. I now knew roughly how far the box would have to be placed away from the subject of our film. I also knew the light level of the image would be sufficient for the Sony EX1 we had planed to use for filming inside the box. The introduction of a lens with a small pinhole style aperture in front of it meant we now had an adaptable system capable of capturing an interesting image.
| Focus Markers on brick wall |
| Filmable Pinhole Camera Focus/Depth of Field test |
| Focus Test 1 |
| Focus Test 2 |
| Focus Test 3 |
This test, although very rough, did help cement a few issues with the system. I now knew roughly how far the box would have to be placed away from the subject of our film. I also knew the light level of the image would be sufficient for the Sony EX1 we had planed to use for filming inside the box. The introduction of a lens with a small pinhole style aperture in front of it meant we now had an adaptable system capable of capturing an interesting image.
Sunday, 24 October 2010
Experimentation with Lenses
To start with I worked with the smaller lenses from the slide viewer to see what results I could get. The first thing I noticed was the image tended to be sharp in the middle, but very soft towards the edges. This effect looked interesting and Dan Duran liked it initially. However we decided a vignetted look was clearer and introduced a piece of tube to the front of the lens to control the light. Essentially we only wanted to use the center of the lens.
The first images I achieved worked, but where too small. The focal distance from the lens to the image plane was very small, meaning the image plane had to be very close to the back of the lens, creating a small image. The picture bellow was taken with ambient light leaking through - but an image can clearly be seen, which was a vast improvement on my earlier experiments with just a hole in tinfoil.
I then set about testing the overhead projector lens using the same vignetting tube effect. I placed the lens on the front of the box I had constructed and then sealed out any ambient light.
I now felt very good about the filmable pinhole camera system, and positive a good result could be achieved for the shoot that had now been scheduled. The next thing to do was test the depth of field issues created by introducing a lens to the system and also to finalize the actual shooting set up incorporating the digital film camera.
Wednesday, 20 October 2010
Lens Introduction
To achieve an image with enough light to be filmed by the Sony EX1 camera, a lens is needed. By simply using a pinhole alone, with a clear focus, means the hole has to be very small. If the hole is large enough to give a good light level it means the focus goes soft. The lens we have is from an overhead projector and has a very large projection size (thanks to Val for lending it to us).
I also dismantled an old photographic slide viewer I had knocking around which delivered some positive results also. The lenses from the slide viewer are a lot smaller and created much smaller images than the projector lens shown above.
I set about experimenting with the different lenses I now had in the hope of achieving a much brighter image. I did however know that by introducing a lens into the filmable pinhole camera system I would be looking at issues with depth of field, image size and perspective, which isn't such a problem with an image created by a simple hole in a piece of tinfoil.
I also dismantled an old photographic slide viewer I had knocking around which delivered some positive results also. The lenses from the slide viewer are a lot smaller and created much smaller images than the projector lens shown above.
I set about experimenting with the different lenses I now had in the hope of achieving a much brighter image. I did however know that by introducing a lens into the filmable pinhole camera system I would be looking at issues with depth of field, image size and perspective, which isn't such a problem with an image created by a simple hole in a piece of tinfoil.
Pinhole Camera video footage
Here is a link to some video footage of the pinhole camera in its early stage. I asked my house mate Andy to walk towards the pinhole and as you can see the light level is very low - but an image with movement can be seen.
http://www.youtube.com/watch?v=BDKxR0bCXfQ
After this test I spoke to Dan Duran (Director) about the system and how to move forward. It was soon decided that a lens would have to be introduced to increase the light level of the image.
Tuesday, 19 October 2010
Digital SLR pinhole camera tests
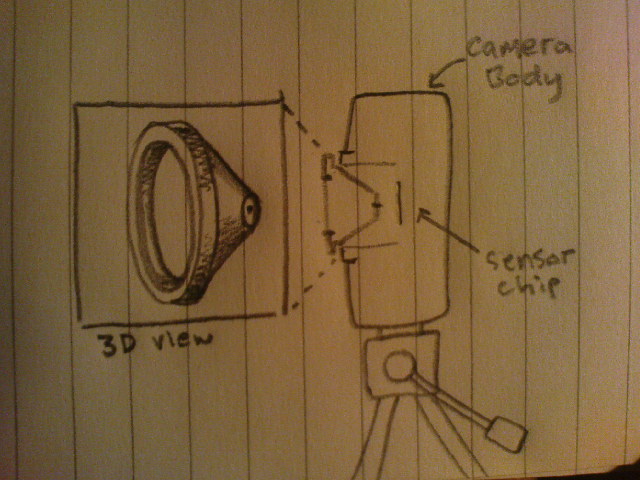
In the early stages of my research and experimentation I also explored the idea of using a DSLR to achieve the pinhole camera look the production required. I considered the idea of placing a pinhole in front of the sensor chip inside the DSLR. The chip would act a bit like the image plane in the larger box version.
Above is a plan sketch drawing of how a potential DSLR pinhole camera could work.
At Focus 24 we hire out film and video equipment, which meant I could do some basic tests during down time at work – not that there’s much of that! lol. By working closely with George at work we achieved some interesting results, that where unfortunately not right for the production, but worth further development at a later stage.
Image created using Canon 5D with no lens but a piece of tinfoil placed in front of the sensor chip.
The thing with DSLR’s is they have a very large ISO range and can film at very low light levels without too much noise being introduced. This would mean the hole in the tinfoil could be very small – only allowing a small amount of light in, but the ISO (sensitivity to light) could be set very high to compensate.
First outdoors tests
Once I had completed my tests indoors I felt it was time to test the prototype pinhole system outside in a full daylight situation with room to test frame size and focus. I carefully carried the box downstairs and out the front door. The first thing that came to mind to rest the box on was the green recycle bin outside the house.
| Box on bin |
| Rear view of box |
| Me, box and passerby |
Sunday, 17 October 2010
Pinhole size
Creating a small round hole in a piece of tin foil is harder than it sounds. When the pin is pushed through the tin foil it tends to tear it. However with some care and a steady hand a good enough pinhole can be made. By making a series of different size holes in a piece of tin foil and mounting them on card I could now set about testing the focus and light level on the image plain.
| Various size pinholes |
| Test looking out of window |
| Image created from test |
Sunday, 10 October 2010
Transporting the filmable pinhole camera prototype
I took the first version of the filmable pinhole camera system into my work place to test it under controllable light conditions. Where I work - Focus 24 - is based in Shoreditch, so taking the system on the train was interesting and lead to a few strange looks from other passengers.
I soon realised there may be some issues with the size of the camera system and how this may effect our schedule during filming. Mounting the pinhole camera system and the EX1 camera together could potentially pose further issues in terms of space to film in as I now know the distance between the EX1 camera and the image plane - unlike as I first drew in my sketches - has to be at least four feet to enable focus.
Wednesday, 6 October 2010
Preliminary tests and research
To start my development of the 'filmable pinhole camera' I decided to create a pinhole camera using my bedroom at home. To do this I made a small hole in the window blind and sealed out any ambient light using gaffa tape and anything else I could lay my hands on. The result was a pale image of the road outside appeared on the wall opposite the pinhole. By then placing a piece of tracing paper close to the pinhole a much brighter image was visible. I now had a better understanding of how to achieve the filmable pinhole camera and the size the box would need to be.
Tuesday, 5 October 2010
Plan drawing
Here is a rough sketch plan of how the Pinhole camera system could work. A, is where the light will come in through a small pinhole made in the front of the box. B, is the image plate (or plane) made of a thin transparent material, like tracing paper and is where the light will hit and create an image. C, is the adjustable casing that will enable adjustments of the size on the image plane. D, is the camera and will most likely be a Sony EX1 digital camera - not a film camera as drawn.
The idea is to mount the camera on a tripod and using a set of bars (usually used for mounting Matt Boxes and Follow Focuses) the image plane will be fixed at a set distance from the camera so as to enable a fixed focal distance. The box will then be secured around the front of the camera and light proofed.
Sketch of proposed system
Above is a simple picture I drew of how I envisioned a filmable pinhole camera would look.
Monday, 4 October 2010
Task: build a filmable Pinhole Camera
My current filming project involves a selection of specialized pinhole camera style shots.
http://en.wikipedia.org/wiki/Pinhole_camera
Pinhole camera's are used to take still photographs over a long period of time. The shots that will be included in this project need to be moving images.
It is my task to build a system that achieves the visual look required as well as being portable and simple to use.
Over the last month I have been developing this system with some results that I will post on here. The main development I have encountered is the introduction of a lens into the system.
This has lead to a reassessment of the original idea behind the shots and the new approach to the idea of a Camera Obscura being present within the film.

The picture here is from the film 'A matter of Life and Death' which features a Camera Obscura used to view the surrounding town and its inhabitants.
http://en.wikipedia.org/wiki/Camera_obscura
The final system will be a box that allows enough light through onto a piece of tracing paper like material that can then be filmed.
I hope you enjoy my research.
http://en.wikipedia.org/wiki/Pinhole_cameraPinhole camera's are used to take still photographs over a long period of time. The shots that will be included in this project need to be moving images.
It is my task to build a system that achieves the visual look required as well as being portable and simple to use.
Over the last month I have been developing this system with some results that I will post on here. The main development I have encountered is the introduction of a lens into the system.
This has lead to a reassessment of the original idea behind the shots and the new approach to the idea of a Camera Obscura being present within the film.

The picture here is from the film 'A matter of Life and Death' which features a Camera Obscura used to view the surrounding town and its inhabitants.
http://en.wikipedia.org/wiki/Camera_obscura
The final system will be a box that allows enough light through onto a piece of tracing paper like material that can then be filmed.
I hope you enjoy my research.
Subscribe to:
Posts (Atom)